

..Wrapping Paper & Ribbon Wall Rack
.
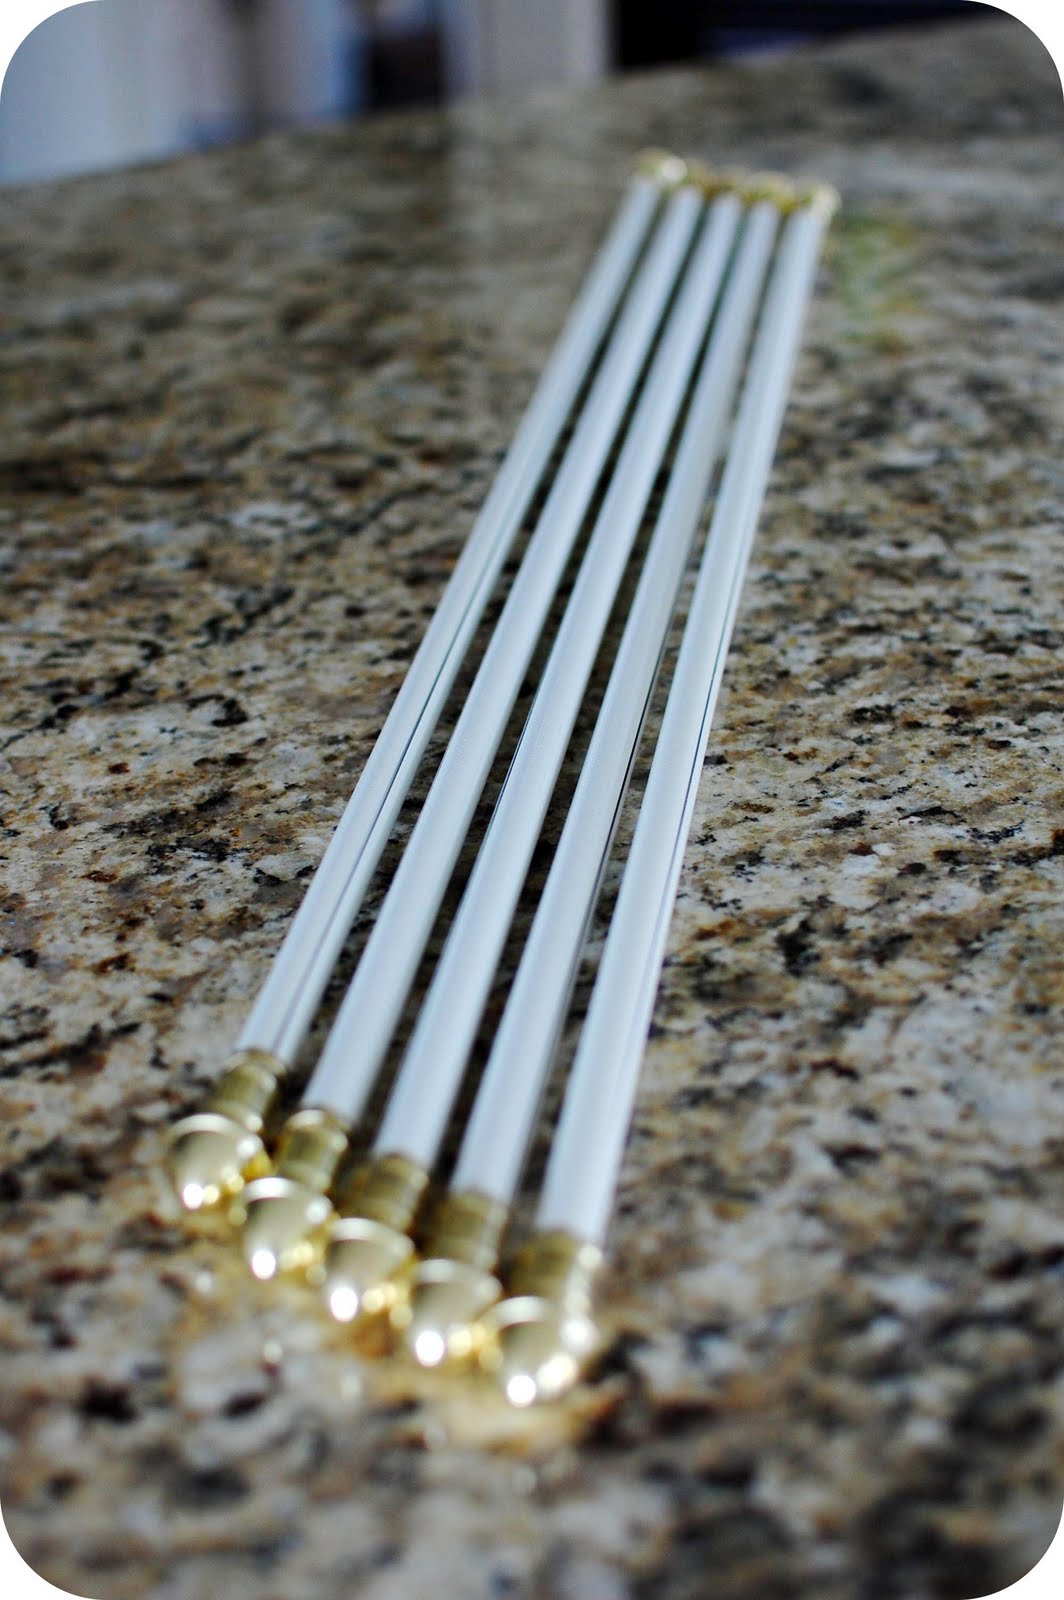
What you'll need:
- 36" x 24" open back frame (Mine came from Hobby Lobby and was 1/2 off)
- (5) 28"-48" cafe rods ($2.99 each @ Hobby Lobby)
- spray paint
- mounting hardware for frame
.
The cafe rods came with brass hardware that I wasn't too crazy about.
.
.
So my first step was to spray paint the ends of the rods and the included hardware. I used Krylon in Dover White.
.

Before:
.

.
And after:
.

.
Much better, don't you think?
.
To paint the rods I stuck them in the ground so the spray painting would be easier. I think my neighbors may have wondered if the rods were a new, permanent fixture!
.

.
Here's the open back frame I used:
.

.
Next, attach the mounting hardware to the back of the frame.
.

.
Attach cafe rod hardware to the front of the frame.
.

.
That's it!
.
Here's the frame hanging in my craft room:
.

.
And here it is with wrapping paper and ribbon:


.
I think it would be fun to do this with a smaller frame and use it to only for ribbon.
.
Thanks for reading - I hope you enjoyed this project!


Brilliant!! Thanks so much for the inspiration.
ReplyDeleteI love this and will def be making one soon!
ReplyDeleteWhat a brilliant idea, I think you should sell the idea to small shop owners!
ReplyDeleteI love this! I wish I had more presents to wrap! I wish I had a craft room.
ReplyDeleteYou have such great ideas!
wow - this is a great idea! thanks for sharing!
ReplyDeleteWhat a great project! It's very practical but also looks beautiful on your wall. Love it.
ReplyDeleteI had been trying to figure out a ribbon storage system and this is perfect! Like you mentioned, I'll probably use a smaller frame and just do ribbon.
ReplyDeleteBrilliant! Thanks for sharing!
ReplyDeleteSeriously now, I think this is by far the best DIY idea I've seen in a loooong time!! LOVE IT!!!
ReplyDeleteI LOVE this idea! I wish I had a room where I could put one of these up. So cute!
ReplyDeleteAlissa, how cool! I love this project! I still need it this size for all my ribbon! :)
ReplyDeleteThis is an awesome idea and tutorial! Thanks for sharing and linking up with PonyTails and FishScales!
ReplyDeleteThanks for sharing. Love it!
ReplyDeleteThis looks great. I am always trying to figure out what to do with my wrapping supplies.
ReplyDeleteThis is brilliant!
ReplyDeleteExcellent idea! I would have to make some wall space in my studio for this but it is a great way for me to organize that which is not organized well right now. It's aggravating. You've shown me a light at the end of the tunnel, lol!
ReplyDeleteI've been wondering how to go about doing this and voila, here's a tutorial today! Thank you! :)
ReplyDeleteGREAT idea!
ReplyDeleteThis is a terrific idea! I think it would be great just for ribbon too. Or if I spread them out I could fold fabric over them.
ReplyDeleteWhat a genius idea! This looks fabulous! Thanks so much for sharing! Hope you have a wonderful weekend! ~ Stephanie Lynn
ReplyDeleteWhat a great idea! I used an old small shelf for my ribbon and did something similar. Great job!
ReplyDeleteWhat a great idea! I have been wanting to do something like that with dowels, but the curtain rods look much cuter!
ReplyDeleteVery clever! I love this idea!
ReplyDeleteWhat a great idea! I've never thought to do that with wrapping paper.
ReplyDeletemackenzieseverdaymom.blogspot.com
I love this idea! I just did a curtain rod repurpose too. Now this makes me want to find more unused curtain rods in my house...
ReplyDeleteStopping by from Tatertots and Jello Party.
-Mama E
www.homeandheartsblog.com
Hi..I’m Barb….I am from Funky Junk Sat.... Love your wrapping center!!!!
ReplyDeleteI am your newest follower. I hope you will get a chance to visit my blog @ santasgiftshoppe.blogspot.com
& get inspired by something for your family/home. I hope you will follow me as well. Nice to meet ya new friend!!!
You are a life saver. I have been making tassels and ribbon embellished bookmarks and I have so much ribbon I don't know what to do with it. This is an answer to a prayer.
ReplyDeleteA big hug out to you. Can you tell I'm a bit stoked. :)
Pam
This is definately on my to do list! Thanks so much for sharing it's an awesome project!
ReplyDeleteLove this! My wrapping paper and ribbon is a major mumbo jumbo. Think this may be the just the ticket.
ReplyDeleteFantastic idea!!
ReplyDeleteLove, Love this idea. I have been looking for a solution for quite some time. Just spent over 10 minutes yesterday just trying to find my wrapping paper. This would solve more than one problem at my house. :)
ReplyDeleteThis is such a neat idea... thanks for sharing!
ReplyDeleteThat is such a great idea. Thanks for sharing. Blessings, Vicky
ReplyDeleteVery clever!!!!
ReplyDeleteWOW - I need one of those!! What a great idea! Much better then the idea I had to store my ribbon (throw them in a box!) I'm following you from Funky Junk Interiors!
ReplyDeleteSam
http://momundecided.blogspot.com/
Great idea! I'm in the middle of re-doing my sewing room, and I've been trying to figure out some way of displaying all my ribbon on some kind of rod. This could be just the thing! Thanks for the inspiration.
ReplyDeleteWow! A really fabulous idea!!
ReplyDeleteI love that it is functional AND color coordinated! Adorable!!
ReplyDeleteAre you freaking kidding me? I have been trying to figure out something like this for my craft room for all my ribbon! You are genius! Thanks so much for sharing this idea, so that I can use it!
ReplyDeletesuper crafty idea! i love the idea and can't wait to whip up one of my own! fabulous idea and so glad you shared! and super glad i hopped on over from making the world cuter mondays too! hugs!
ReplyDeleteVery nice and useful! Everyone needs one of these and you have made a very pretty one!
ReplyDeleteI love it! I have featured it on my blog!
ReplyDeleteThanks for sharing!
LOVE it! I totally agree... a smaller frame with ribbon only would be adorable. I NEED something for all my ribbon. Thanks for the inspiration!
ReplyDeleteAmazing idea! I love it!
ReplyDeleteHi Alissa
ReplyDeleteJust found your blog thru Jane at Finding Fabulous. She did find fabulous - what a great re-use of a frame. Not only functional, but it looks good too. My gift wrap is stored in an urn. I think it may be finding a fabulous new home on one of my studioffice walls. Thanks for sharing a great idea.
Diane
what a great idea! Love it!
ReplyDeleteBrilliant! Thank you for sharing such a great idea! Love it~
ReplyDeleteThanks for linking and helping to make this the most successful Modern Craftswoman Monday so far! Rory
ReplyDeleteLove that! What a fabulous idea and doable.
ReplyDeleteLoooooove this idea! Just wish I had a place to put it. Maybe it'll fit in a little closet, ha. Love your blog!
ReplyDeleteYour project was perfect for me! I am working on organizing my sewing/craft room and this is just what I need. Thanks for sharing.
ReplyDeleteThis is really cool! I'm gonna make one!!! Thanks for sharing!!!
ReplyDeleteBrilliant! Thanks for sharing your steps!
ReplyDeletei dont remember what link party im coming from but i love this! i even just got a huge frame from the thrift store that would be perfect!
ReplyDeletethank you!
That is an absolutely fabulous idea!! AWESOME!
ReplyDeleteI LOVE it! So simple and what a way to make a smile even brighter when wrapping a gift for someone! Brilliant. Thanks for sharing the inspiration. I think I even have some cafe rods lying around needing to be useful again :). I certainly have enough spray paint and large frames looking for work too!
ReplyDeleteUmm yeah this is AMAZING!!! I am in the process of redoing my Craft Room and this will DEFINITELY be going in! I'll link back to you when it's done! You're tutorial is so good too! Love the pictures!
ReplyDeleteThat is such an amazing idea. I love the way it turned out!
ReplyDeleteXOXO
Jen
awesome job!
ReplyDeleteLove this idea. Came over from your craft room post. New follower!
ReplyDeleteThis is the best ribbon/wrapping paper center I have seen. Thanks for sharing!
ReplyDeleteSo cleaver. I did something similar, but I used the rod hardware and attached it to the front of a book shelf and used wooden dowels. The picture frame is terrific because it also holds paper.
ReplyDeleteThanks.
Love this! What a great idea. Thanks so much for sharing. I just discovered your blog today!
ReplyDeleteUm...wow. Seriously amazing!
ReplyDeleteThis is exactly what I need, and at the right price (got to love Hobby Lobby). I have a cluttered room to clear out for a new baby (yay!), and all my giftwrap mess has to move to the laundry room, an already small space--but it has free wall space I've always wondered what to use for. I'm hoping this will make me pare down the number of gift wrap rolls I keep in the house--yours looks so clean and elegant. This solves so many problems for me! Thank you so much!
ReplyDeleteI just linked over to you from Magical Meadows and I'm so happy I did. LOVE this idea. COPYing this idea. Thanks for sharing.
ReplyDeletethanks for sharing!
ReplyDeleteThis wall rack really look so cool and unique. I never thought that from just a simple frame, it can be turned into a masterpiece. Like you, my wife loves doing some cute stuff in our home. One time, she went to some brass distributors and brass manufacturers and she made a shoe rack made up of brass. Women are great and creative also in doing a lot of things to improve and beautify their homes.
ReplyDeleteI adore this project!!!! This is exactly what I was looking for. Can't wait to make it happen. Will link back!
ReplyDeleteFAntastic idea I StumbledUpon... I think i may use this in my closet for belts and jewlery storage :)
ReplyDeleteGroovy idea and it looks great! Better than the available options online that are metal racks (not that there's anything wrong with them, I just prefer this look more). Thanks for sharing this project, it looks like something I can tackle.
ReplyDeleteI love this. I think this is project in my very near future. Thanks for sharing.
ReplyDeleteBRILLIANT!
ReplyDeleteIf you have a minute I would love for you to shar it on my link party. I hope to see you there!
Just bought an open back frame for this project!
ReplyDeleteWhat an awesome idea! I've been looking for something like this that I can make myself and not spend a fortune on. Thanks for sharing!
ReplyDeleteI made this today but I did it in black to go with my "wet cement" colored wall. Thanks for the idea.
ReplyDeleteI cannot tell you how grateful I am that you shared this fabulous solution. I have spent weeks going from store to store and website to website trying to find a smart and attractive way to store these items. I came close in my mind but no cigar. You are truly talented and generous enough to share as well. Many, many thanks:-)
ReplyDeleteYou know you could do this on a much larger scale and use it as a room divider/screen, or over a window as window dressing. If you have some wood trim, a mitre box and a staple gun you could make custom sized frames.
ReplyDeleteThis looks really great...you did a wonderful job.
ReplyDeleteLove this idea.
ReplyDeleteCan't wait to make this for myself.
Thank you
=)
Wow, your how-to is so clear and detailed! You really save your reader from struggling away to figure out any detail!
ReplyDeleteI wanted to mention that if your ribbon needs more space for the fatter rolls..the brackets that hold the rods come in a few lengths. Makes it so the frame isnt pushed out from the wall by the spools. :D
ReplyDelete